I spent the Labor Day weekend learning how to add text and 2D video into an immersive video scene. I’m doing this because I have this vision for a film/app for the Apple Vision Pro and I thought I could 1. prototype a large part of this experience in video and 2. I could also make immersive videos like this and learn how to tell stories in this medium.
So to begin with, I came up with the requirements for my project.
- I had to use existing video. I wasn’t going to waste time shooting new things or trying to have this video mean anything or stand on it’s own. I’m just working on learning the technical part.
- I want to include text in the 3D space.
- I want to include 2D video in the 3D space.
There’s more I want to learn — immersive audio & 3D video in the 3D space — but I’ll save that for another time. Knowing how to add text and 2D video is most of what I need and it allows me to work on storytelling in parallel with the other technical skills.
- Apple Vision Pro: download this video and view it in Spatialgen.
- Meta Quest: use this version (to view in 3D, put the video in fullscreen, then put the browser in fullscreen, finally choose VR 180 Left/Right as the projection mode)
- You can also watch it on YouTube.
Process
Most of what I learned comes from Hugh Hou’s tutorial. The rest comes from lots of trial and error. Davinci Resolve’s Fusion is very finicky. I found that I had to turn off auto resolution on my Render3D node first or the app would become unresponsive. I also found that sometimes the output simply wouldn’t work as expected and to fix it I’d have to disconnect nodes and then reconnect them again (kind of like turning things off and back on). Lastly, the audio and video on the 2D video is way out of sync. I couldn’t find a way to pass through the audio from the video clip in Fusion. Instead I added it directly to the timeline on the Edit page. The result is that the video ends about 7 seconds before the audio. I don’t know why – I’ll have to investigate.
Below are my notes on the settings of individual nodes.

To create text in the 3D space add:
- Text3D – you can use this to create flat 2D text or 3D text. Setting the V Anchor to the middle will put your text at eye/camera level.
- Ambient Light – this is good if you want flat 2D text. If you want 3D text, add some extrusion and a Spotlight so you get shadows.
- Spherical Camera – this matches your physical camera. I set the eye separation to .06 because the lenses on the Canon dual fisheye lens are 60mm apart. The converge distance is 250 (basically really far away)
- Merge3D – the text, lights, and camera are all inputs to this node. If you set it to show on one of the monitors you can see what you are doing when you adjust the position and size of things in the scene.
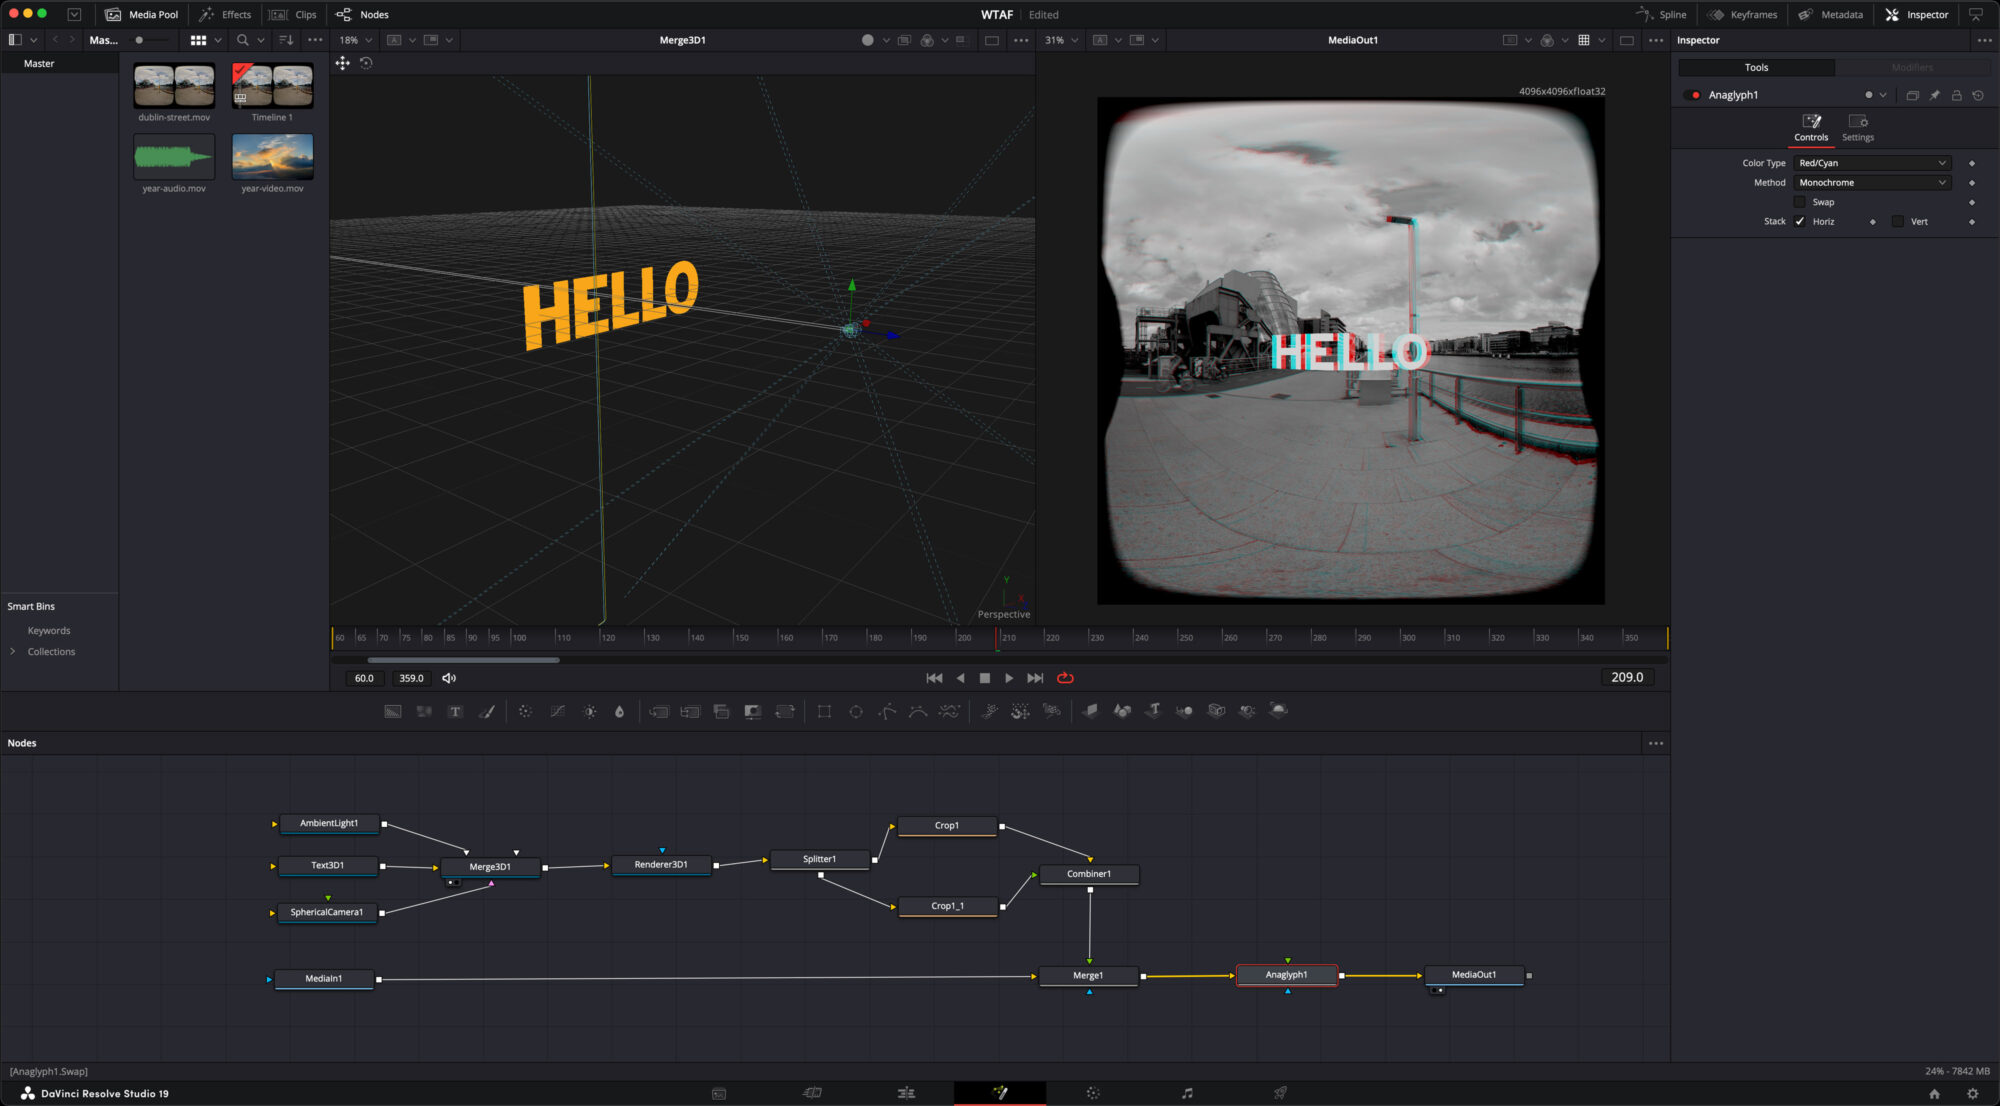
- Render3D – before I connect this, I switch to the image tab, uncheck auto-resolution, and set the resolution to 4096×4096 (or whatever the single-eye resolution of your video is). Then I connect the Merge3D node to it and set the camera to the Spherical Camera and set Eye to Stack (side-by-side) is the default.
Then you have to do this split, crop, and combine nonsense. Hugh Hou explains this in the tutorial — it seems to be a bug in Fusion. Basically, the frame size of the Render3D node is enormous for some reason and we have to crop out all the extra empty space.
- Splitter – set to horizontal split
- Crop – set the X Offset to half your frame size – 2048 in my case. Set the X and Y size to 4096.
- Crop – create a second Crop node for the other eye. Use the same settings. How Fusion knows to put the left side into one crop node and the right side into the other is a mystery to me.
- Combiner – set to Horizontal
That whole node structure gets sent to a regular Merge node between your MediaIn and MediaOut (your video timeline). Hopefully, at this point you can see your text over your video. If you can’t, double-check all the settings. If you still can’t, disconnect things and reconnect them. I had to do this.
To add a 2D video in the 3D space:
- Drag your clip to the Fusion page and it will make a MediaIn node for it.
- ImagePlane3D – connect your video to this
- Spherical Camera – add this – same settings as before
- Merge3D – connect these to a Merge3D node and then it’s the same process from here out.
Notice in the screenshot and in my notes there is an Anaglyph node before the final MediaOut. Set this to Horizontal to preview the 3D effect with a pair of Red/Blue 3D glasses. This will help you place things in the frame and avoid stereo conflicts (with the light pole in my case). Don’t forget to turn this node off before you render your output.
The missing piece here is being able to preview all of this in a headset. I believe if you have a PC and a Meta Quest headset you can. From Apple’s WWDC event in June it sounds like this is coming to Mac and Apple Vision Pro later this year. Without being able to preview in the headset, I had to render a few fames and download them on the Vision Pro so I could check how it all looked. I did this 4 times to get it right. Hopefully I’ll get better with experience.
When you’re shooting with the Canon R5C there is a guide that shows what is essentially your “frame.” This area is really all you have to place text or video so that it can be seen without moving your head in the headset.
