
Making WebM Video
A video was here: open its address
WebM Download – HD
There was a lot of talk this week about WebM video after Google announced that they were going to drop H.264 support from Chrome. This is huge news for video makers, especially since Firefox 4 (which supports WebM) is almost done. I figured it was time to look into WebM encoding tools again. There still aren’t many options at all but I found a way that works great for my workflow — Final Cut Pro & QuickTime 7 Pro.
Before I get to that though, the hands-down easiest way to make WebM video is get the Miro Video Converter. It’s a super simple, drag and drop app. Just export a good web-quality video from your editing program and then drop that in the Miro Video Converter. Select WebM from the dropdown and hit convert. It does a decent job (though the bit-rate/quality is a little too low for my taste) on most video.
To get more control over the process you can use ffmpeg, build the reference encoder from source (neither are my idea of fun) or install the WebM components for QuickTime (there are also DirectShow filters for Windows but I didn’t try those). So here’s what you need:
- Download and install the
WebM Components for QuickTime - Download and install the Xiph Components for QuickTime (I’m pretty sure you need this for Vorbis audio which I didn’t explain in the video)
Once you’ve got those installed, open your source video in QuickTime 7 Pro. The first thing you’ll have to do is to re-size it because there aren’t height and width controls in the export dialog. To do that:
- Go to the Window menu and select Show Movie Properties.
- In the Properties window, select the video track.
- Then change the scaled size to 640 X 360.
Once we’ve got the video sized, we can set up the encode. Don’t worry. You don’t have to do this every time. Once you set it up, QuickTime will remember all of your settings. You’ll only need to change these if you want to change the bit-rate or make adjustments to the advanced settings.
- Go to the File menu and select Export…
- In the Save dialog you should now be able to select Movie to WebM from the Export dropdown menu.
- Click Options… to continue configuring the export.
- Now click Audio Settings… and make sure you’ve got Vorbis (required for WebM) and Stereo (if you want it) set. Then click OK.
- Then click Video Settings…
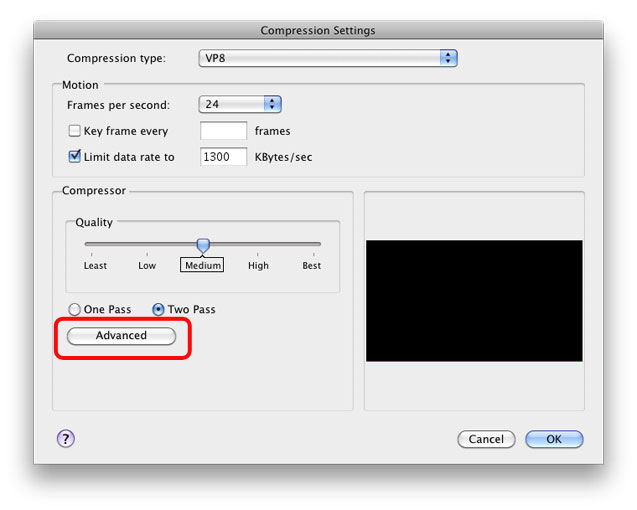
- Here you want to make the basic encoding settings. These are meant to be a good starting point for 640 x 360 video.
- Set the frame rate (same as your source video).
- Make sure the key frames is unchecked.
- Limit the bit-rate to 1300 kbps.
- Set Quality to Medium
- Select Two Pass
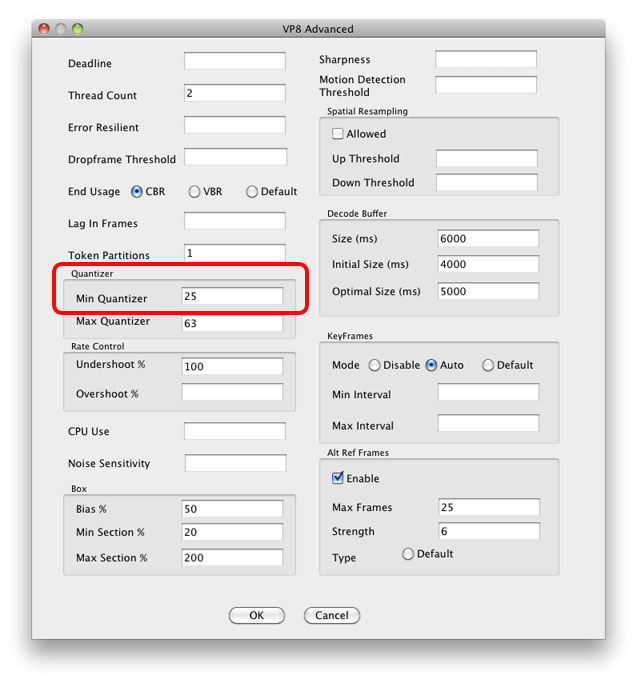
Once you’ve finished making the basic settings, click Advanced to move on to the next bunch of settings. There are lot of things to set here. I’m not going to list them — just copy them from the image below. You can read about these settings in the WebM documentation. The most important part of these settings and the only one you’ll probably have to modify at some point is Min Quantizer. This setting controls how many bits get used on the most difficult to encode frames. The lower the number the more bits get used. If you set this too low the encode will overshoot your target bit-rate. I found that for many applications, setting this between 20 and 30 produced great results without overshooting your target. If you have really hard to to compress video (lots of fast motion, lots details) you’ll probably have to jack this number up. For this crazy concert video I had to set it to 47.
Once you’ve made all of these settings, click OK in all of your open dialogs to start your encode.
Here are some sample videos so you can compare quality and bit-rate:
- Kitty – WebM, 738kbps
Kitty – iPod H.264, 1609kbps- Kitty – WebM Miro Video Converter, 417kbps
- Mozilla Summit – WebM, 1059kbps
- h.264 and WebM side-by-side comparison (ironically it only works in Chrome — for the next few months)